
Before you start building the Two-Chamber Rocket Bat Box, read through this blog on how we built it and mounted it on the pole. We had some trouble with the plans… some of the measurements did not work for us. This blog has a lot of supplemental information so that you can succeed on the first try.
This article has beginner friendly notes and lessons learned from building a large bat house. Over the course of a year, I, Josh, and K worked on this project and finally got it in the ground a few weeks ago.
Please share this post! We would love to see more bat boxes being made and spread the wood about bats. They protect us against night insects and are just plain cool! Plus, you can bond with friends and learn to build stuff during this project.
We followed plans from Bat Conservation International for the Two-Chamber Rocket house.
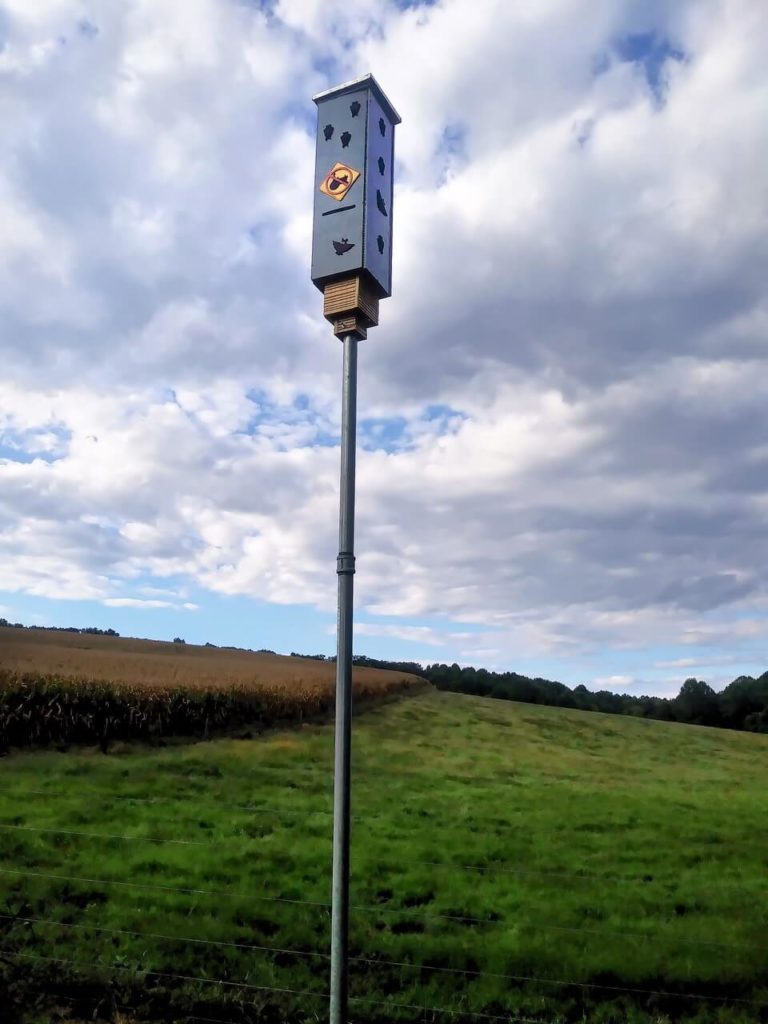
This bat box can hold up to 400 bats and is supposed to be the best. (credit = Josh). It is also pretty large – it weighs about 30 lbs without the mounting pole, probably 100+ lbs with the pole, and is about 4 feet long by 1.5 feet wide by 1.5 feet deep in size.
Cost… I hate to give you the bad news, but this bat box probably cost us $300 in materials, not counting tools. We had a table saw, drills, and clamps already. The pipe was more than $100 by itself.
1. Download and print the bat box plans
Bat Conservancy: Plans for a Two Chamber Rocket Bat House
This entire blog assumes you’ve read and are following the above plans for a Two-Chamber Rocket Bat House mounted on a pole. So download it, print it, and read it now!
Bat Conservancy: Design tips for successful bat houses
This is a great reference document about what works best for bat boxes. Because the goal is to have bats move in and thrive in our creation!
2. How to get bat box materials
The boards which make the sides and inside of the bat box
Home Depot, Lowes, or other large home improvement stores have all sizes of boards. We got poplar boards which were finished, but not fine quality. In particular, we tried to get ones with small knots, that were not warped. Less than $10 per board.
During our build process, we found that the outside wall (the 1″ by 10″ board) needed to be larger than the plans said. I recommend getting a 1″ x 12″ board instead, just in case.
Make sure that your boards are 3/4″ thick. This is default for finished lumber in the USA. The board will be advertised as 1″ x whatever, but the actual thickness should be 3/4″. This measurement will be very important through the entire build process.
You can see the 2″ coupler in this photo which connects the 5′ pipe at the top with the 10′ pipe on the bottom.
The steel pole which holds the bat box in the air
The plumbing section had 10′ steel poles. These were surprisingly expensive and heavy – each 10′ steel pole was $50 and probably weighed 50 lbs. We bought two, had the store cut one in half, and asked the store representative to put threads into the ends of the cut pole (the whole poles had threads already). Cutting and threading the pole was a free service at Home Depot. Then we bought a 2″ steel coupling (female female) with threads the same size.
Recommended: If you want your bat box higher in the air (17-18′ high), you will need to buy two couplers so that you can use all the pipe. We only bought one, so we could only join the full size pipe to a half-pipe. (the bat box was 12-13′ high when mounted in our field).
It did come in handy to cut one pipe in half because then we only needed to fight with a 5′ pipe while assembling the bat box in our workshop. Did I mention the pipes are heavy?
Pipe wrench or chain wrench to screw the poles into the coupler
While you are at the hardware store, look through the assortment of pipe and “chain” wrenches. It takes a lot of torque to get the pipes threaded together.
We got one of these, which is called a Locking Chain Clamp. It worked better than anything else we had. We had one. Ideally, we would have had two, or something else like a pipe wrench.
Not recommended: Rubber Strap Wrench
The rubber strap wrench we used was not strong enough to twist the heavy steel pipe.
A huge sharpie
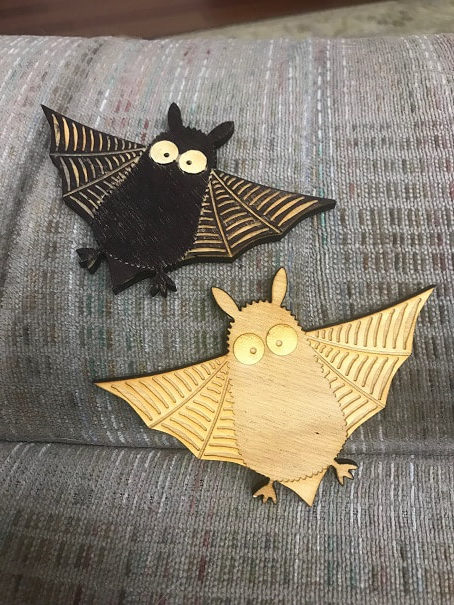
K’s number one tip is to get a big sharpie. It was used to color the bat cut-outs (decorative) a nice of black.
The carriage bolts which connect the bat house to the pole
The plans say to get two 1/4″ by 4 1/2″ carriage bolts, washers, and nuts.
We found that these bolts were too short. Get 6″ bolts instead. Make sure the threads go the entire length (or at least 2 inches up) so that you have some room for error.
When the directions say “washers and bolts,” it assumes that the builders have common sense and a background in making things. If this isn’t you, I have descriptions of exactly what we bought.
You should get 4 washers (2 for each bolt). The washers should have a 1/4″ hole in the middle, but also should be wide and sturdy. For example, the washer should be about 1″ wide, and fairly thick (2mm?). One washer will be put near the head of the bolt, outside the wood. One will be on the far end of the bolt, next to the nut.
You will need 2 nuts. These nuts should be 1/4″ in size. Try to screw them onto your bolt in the store – this makes sure that the nut threads are the same size as the bolt threads.
The dark metal roof for your bat box (or shingles)
I have no idea where to find a “dark metal sheet” as listed in the plans.
We bought a very thin (18 gauge?) stainless steel sheet and cut it into size with tin snips (heavy duty scissors may have worked too). The sheet overlapped the roof by about 1″ .We bent the edges of the sheet so that it formed a loose little hat over the roof. Since it is really important to keep a bat box warm, we probably should have painted the top gray as a last step.
Optional: Paint your metal roof a dark color.
I have no experience or opinion about using shingles. Please leave a comment if you know how shingles work!
Exterior grade paint and primer
Your paint has two purposes – to keep the temperature near a specific temperature (darker paint is used in colder climates) and to preserve the wood.
Controlling the bat box temperature with paint colors
The primary purpose is to control heat inside the bat house. The color depends on your average summer temperatures. Here are recommendations from the Bat Conservancy:
- Black = July high temps are < 85°F
- Dark brown or dark gray = July high temps are 85°F – 95°F
- Medium colors = July high temps 95°F – 100°F
- White or light gray = July high temps > 100°F
If you plan to mount your bat house in shade, use darker colors. I don’t know exactly what that means… perhaps one level darker? Unless you are in a very hot area (average high temps > 100°F) , you should mount the bat house in full sun.
We are in Maryland, USA, which is in the “medium colors” zone.
Preserving the bat house wood
The exterior paint is meant to waterproof the bat box and keep the elements from wearing down the wood. But in the small print, the plans also mention staining the inside surfaces.
Inside surfaces need to be roughened so that the bats can cling and climb the walls easily. This can be done by scratching the wood or cutting small grooves into it (we cut grooves). The paint cannot fill in the grooves or the bats will lose their claw-holds, so the plans say to use a water-based stain.
Protecting the interior was a big question for our group. We decided to 100% waterproof everything by using water-based polyurethane sealant. K and I did research, and even contacted a bat organization, to see if polyurethane would be a problem for bats. We were told that it should be OK.
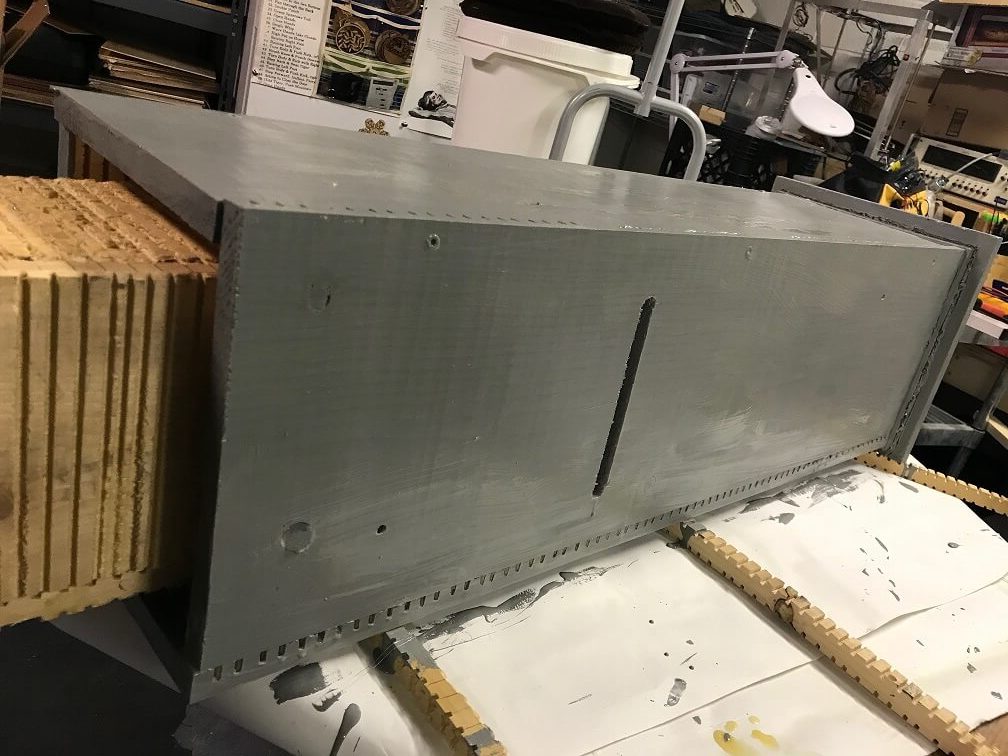
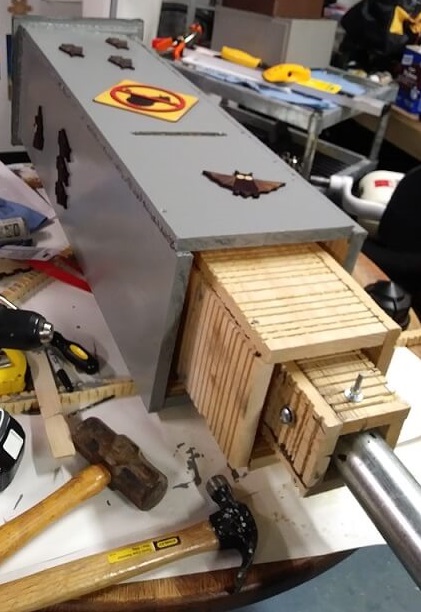
This picture shows the medium gray paint we used (water based exterior latex + primer). The inner wood has been coated with water-based clear polyurethane sealant.
Lesson learned: Cut once, seal once. (I’ll give actual dimensions for the cuts soon). I don’t know whether polyurethane or stain is better, but we know stain works because lots of bat houses have been built with it. Polyurethane should protect the interior against guano better. I’ll update this article once we’ve had time for bats to move in and give their feedback. (squeek sqeek)
Clamps – an important tool for putting together the sleeves
The instructions don’t mention clamps, but you should have them on hand.
- We used four smaller clamps to hold the spacer blocks in place while drilling and screwing them into place.
- We used four large adjustable clamps to hold the sides together in a square shape. These clamps were very important because the design calls for the boards to overlap partially. This end-on-flat shape is very hard to hold stable without clamps.
1/4″ drill bits for the pipe
You will need LONG drill bits for mounting the pole to the bat box. I recommend trying to find 8″ or longer bits.
Make sure the drill bits are rated for steel. The package should say it is rated for metal or steel. Cobalt bits are especially strong. You might want to get two, since this project can cause them to dull.
While you are at it, obtain a drill that plugs into the wall for power. I’m not optimistic that a battery powered drill will be able to do this job.
Phillips head screw bit and bit holder (so you can use your drill as a screwdriver)
The first examples the video shows (0:08 – 0:24) are what you want to get.
Plastic mesh 1/4″ or 1/2″ (optional)
The Bat Conservancy website mentions an alternative to cutting grooves for the bats to climb on. Instead, you can staple “durable plastic mesh” to the climbing surfaces of the interior. We didn’t know about the mesh recommendation until after the build. Grooves took a long time to cut and probably won’t last as long as the mesh would.
This is the type of mesh I would look for if I was building another bat box.
Concrete to hold the pole in the ground
The plans don’t mention concrete, but you will want concrete to secure your pole in the ground. I recommend QUIKRETE because you don’t need to mix it for setting poles.
If you plan to put your pole into the ground, you will also want to have these tools available:
- Post hole digger
- Digger and tamping bar – this is a long metal bar used to loosen dirt before you pull it out with the post hole digger.
- A level – this is used to make sure your bat condo isn’t leaning once it is in the air.
3. Building the bat house step by step
Cutting the boards, spacers, and roof
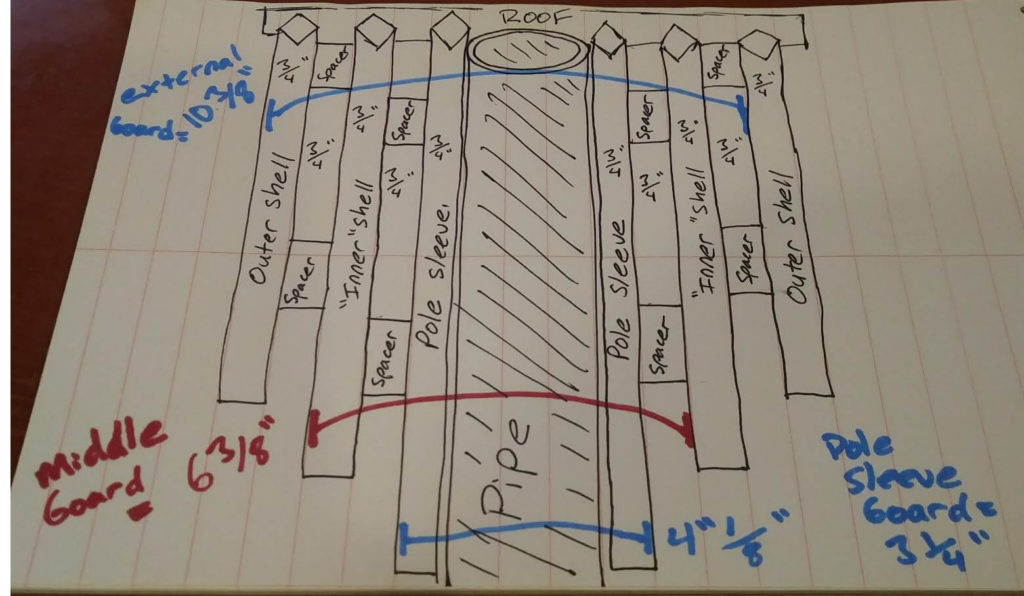
We cut everything out per the Bat Conservancy Rocket Box plan, which turned out to be a mistake. We should have left the ‘inner shell’ and the ‘outer shell’ for later, once we knew the actual dimensions of the interior box (the pole sleeve).
These are the actual dimensions from the bat box we built. The way the boards fit together edge to flat makes it hard to diagram properly. Basically each board has to be as wide as the previous sleeve + the two 3/4″ spacers. The third 3/4″ is from the next board which forms a corner with the first board.
Slight warping and the roughness of the boards will add 1/16″ – 1/8″ to each sleeve as you assemble the pieces.
Go ahead and cut the pole sleeves and the spacers out now. Do not cut the roof, inner shell, or outer shell yet.
Beginner friendly: How to use a table saw safely
Make ladders for the bats to climb around inside
Roughen up one side of the pole sleeve boards by scratching them horizontally with a sharp object, or cutting very light grooves in them with a table saw.
Lesson learned: We cut grooves with a table saw. It took HOURS. Despite our best efforts, the grooves ranged from 3/4″ apart to 1/4″ apart. The bats do best with 1/4″ to 1/2″ grooves. I’m worried that they will have trouble with the further apart grooves. Since I was the designated groove cutter, this is all on me.
A better way: The bat conservancy design page recommends using durable square plastic mesh (1/4″ – 1/2″) as an alternate to cutting grooves. I think that would have been a better idea. It also would have saved us several polyurethane sessions. If you use plastic mesh, attach it after you treat the boards.
Stain the boards and spacers
Self explanatory. Remember it is important for the inside to be rough so that bats can climb it like a ladder, so use stain, not paint. We also sealed the spacer blocks.
Assemble the pole sleeve
Start with the pole sleeve boards. The rough side should face outwards. Hold the boards together per the plans (they will form a box with edge touching flat).
Make sure all the boards line up flat on the top of the bat box (where the roof will go). This is also a good time to make sure the pole sleeve fits over your pipe (it should have plenty of clearance if you cut it per the plans).
Apply a line of caulk where the boards touch, clamp them together, then screw the boards together. Remember to pre-drill holes for the screws (the drill bit should be smaller than the screw threads).
Next, clamp the spacer blocks to the pole sleeves in the pattern suggested. It is not important to be precise. The spacer block should only add 3/4″ to the width of the pole sleeve. The 1 1/2″ and 4″ dimensions should lie flat on the pole sleeve board. Pre-drill holes and screw the spacers onto the pole sleeves. Use the 1 1/4″ screws for this.
Beginner friendly: How to use a drill
Beginner friendly: How to pre-drill holes for screws
Measure your pole sleeve and adjust the rest of the bat box
At this point, take some measurements of your pole sleeve + spacers. Verify the width for your inner boards (normally this is pole sleeve width + 3/4″). Then cut them out and stain them. Both sides of your inner boards should be rough. You should have a passage hole drilled in the center of two boards as shown in the plans.
How do you drill a passage hole for bats to move through?
If you have a 1 1/2″ spade bit for your drill, you can probably just drill it right through with that. If you don’t, you can use a smaller drill bit (such as a 1/2″ bit) to cut a pattern in the wood, then use a hack saw or similar tool to cut between the drill holes. It isn’t like the bats will care. “This hole isn’t perfectly circular, I’m cancelling my lease!”
The plans say to create a hollow box from your inner boards and ‘slide’ this over your pole sleeve. For our build, this would not have worked. The inner shell would have been too tight. If this is your situation too, I recommend clamping the inner boards onto your pole sleeve before screwing anything together.
Once you are ready, apply a line of caulk to where the inner boards touch, re-clamp them, and screw the sides together. Then screw the inner board to the spacer blocks (try to aim between the two existing screws on each spacer).
Make sure all the boards line up flat on the top of the bat box (where the roof will go).
Measure your inner shell and adjust the rest of the bat house
Almost there!
Take some measurements of your inner shell + spacers. Verify the width for your external boards (normally this is inner shell width + 3/4″) . Then cut them out and stain them. Remember to put the rough wood on the inside. The vent holes should be toward the bottom of the bat box.
The plans say to create a hollow box from your outer boards and ‘slide’ this over your inner shell. For our build, this would not have worked. The outer shell would have been too tight. I recommend clamping the outer boards onto your inner shell before screwing anything together.
Once you are ready, apply a thick line of caulk to where the outer boards touch, re-clamp them, and screw the sides together. Then screw the outer board to the spacer blocks (try to aim between the two existing screws on each spacer).
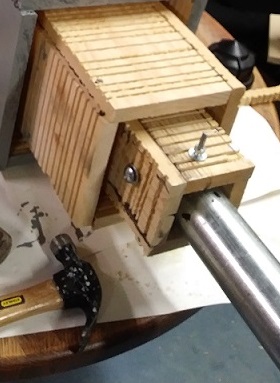
Double-check your caulk job to make sure the external corners are sealed fully against air and water. Push in more if needed. Because we cut grooves into our boards (instead of using plastic mesh), the external boards had holes at the grooves. We used our thumbs to push caulk against the outside of each groove to seal it.
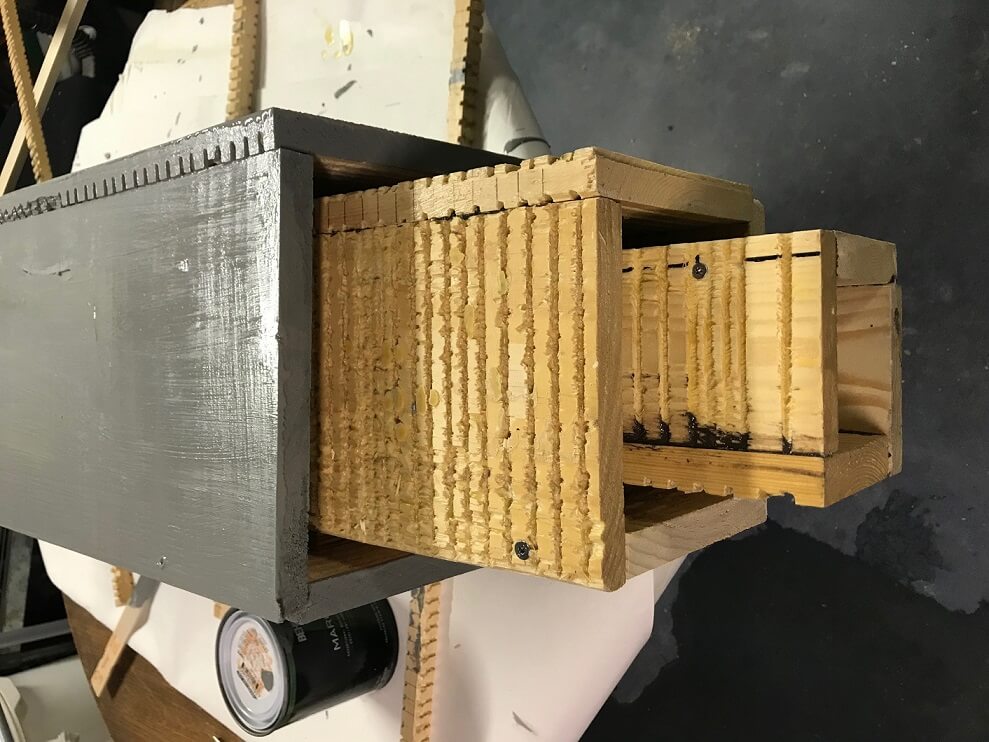
You can see the grooves on the corner of the exterior and interior shells. Between layers of paint, we sealed the small groove holes with caulk.
Make sure all the boards line up flat on the top of the bat box (where the roof will go)
Adding the roof to your bat house
You haven’t cut the plywood roof yet, right?
Measure the actual dimensions of your bat box (or hold it upside down against your plywood and trace it). Cut out two roofs, one that is the same size as your box, and one that is 1″ wider on all edges. It helps if you mark your plywood and the bat box on the same corner so you can match them after cutting the roof.
Caulk around the top of your bat box sleeves (or at least the external sleeve) and clamp the smaller roof into place. Pre-drill holes and screw it into your external sleeve. Use about 8 screws.
Caulk around the top of your small roof and clamp the large roof into place. Pre-drill holes and screw it into your small roof.
(This only applies to metal roofs, I don’t know how shingles work.) Caulk around the top of your large roof and push your metal roof into place. Use the small nails around the sides of the roof to secure it into place (try not to put holes in the top). We hammered nails into the folded-over metal corners. Ideally this will let water drip freely off the roof and away from the bat box.
Attaching the pole to the bat box with bolts
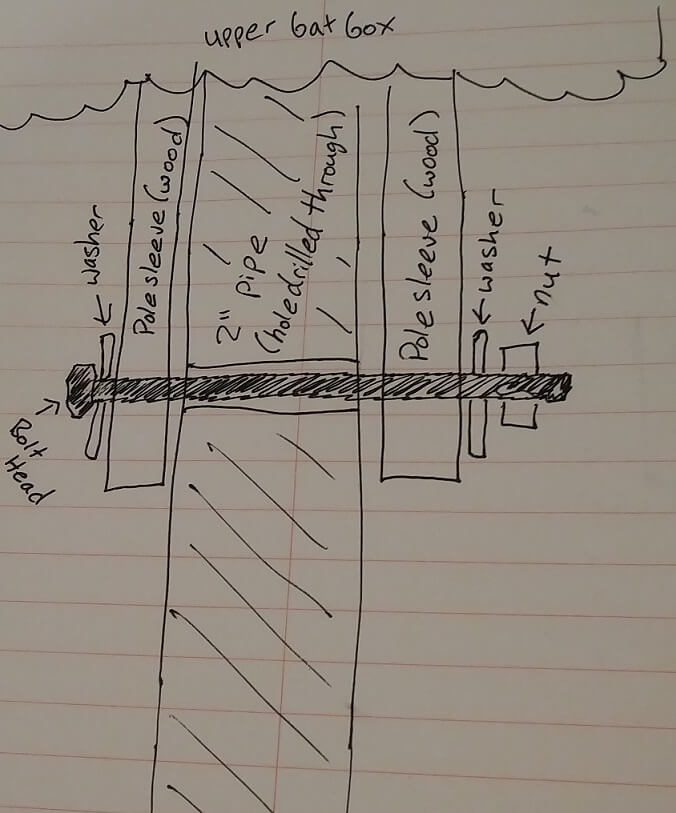
This is a drawing of how the bat box is secured to the pipe with a carriage bolt. You will drill a 1/4″ hole across the pole sleeve, through the 2″ pipe, and out the other side of the pole sleeve. The drawing is a bit inaccurate regarding the hole in the pipe. You only need to drill through the walls of the pipe. It isn’t solid.
This step was hard, but doable. We were missing Josh that day, so K and I tackled this task ourselves.
Don’t do this: We started out using a drill press to cut through the pole. We didn’t have enough clearance for the bat box + pole, so we only cut through the pipe. Once we finished, we had trouble lining up the holes in the wood with the previously-cut holes. We ended up abandoning our drill press holes and just drilling the wood and pipe straight through.
You will need to drill two holes that go through the entire pole sleeve + steel pole. One in each direction. Put one fairly close to where the inner sleeve joins, and put the other one low, so that the bolts don’t hit each other.
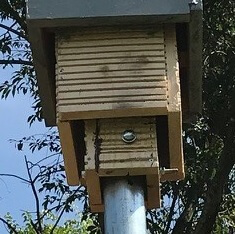
Another close-up on the bolts.
It is very helpful to stabilize the pipe inside the pole sleeve somehow before you start drilling. One possibility is pushing the pipe against a corner of the sleeve. Another is to clamp everything down on a third surface.
Use your long 1/4″ drill bit, make sure it is very tight in your drill, and point it through the middle of the pole sleeve! Make your first hole close to the bottom of the inner sleeve (but far enough away that it doesn’t interfere with your drill).
Keep drilling the same hole until you reach the far end. Drilling through each surface of the pole took us 5 minutes. Drilling all the way through makes it much easier to mount the bolt later.
Once you get the first through hole, put the bolt, washers, and nut in immediately. You don’t want to lose the alignment of the pole sleeve to the pole.
Then repeat for your second hole. It should be lower on the pole sleeve, traveling perpendicular to the first hole.
How do you drill a hole through metal?
Slowly, with breaks, and ideally some oil. Most drill bits can drill through steel.
Drill bits are tougher than the steel pipe as long as they stay cool. If you try to go too fast, the drill bit will heat up, causing it to dull and even melt at the tip.
How do you keep a drill bit cool?
- Pour a small amount of oil into the hole as you drill it. The technical term for this oil is “cutting oil”. Alternatives are 3-in-1 oil, motor oil, or nothing. Nothing is OK. At first, you might only put one drop on the metal. As it gets deeper, you might fill it with a few drops of oil. Or put the oil on the drill if you can’t reach the pipe.
- Drill at SLOW speed. 4 rotations per second? At least, go much slower than the full speed of your drill.
- Don’t press down on the drill bit too hard. You want it to be slowly cutting the metal, but not trying to take big chunks out. This will cause it to dull quickly. Push down until you see some metal coming off, then hold that amount of pressure.
- Stop every 15 seconds or so and let your bit cool down if it gets hot. You can dunk it in water or oil for speed.
Painting the bat box with exterior paint
This was straightforward for us. We only painted the external shell and roof, we left the inner shell and pole sleeve unpainted. I recommend painting your metal roof if it is reflective, especially if you are in a cooler region. We used two coats of combined external paint + primer.
Adding bling to the rocket bat box
When we discussed which site to put the bat box originally, I complained that I would probably run into it with my tractor by accident. I run into EVERYTHING with my tractor by accident. Small trees, the sides of my house, the garage. Ugh. Anyways, I’m a menace when I lawn mow or tractor.
So K designed a No-Tractor sign to put on the bat box. As I’m careening through the field with cows moo’ing and small trees flying in all directions, I am supposed to look up, see the sign, and avoid the bat box pole…
(we are doomed)
Long story short, we added some decorations to the bat box so that observers would understand the purpose. I’m not a decorative person by nature but they turned out really well.
The infamous no-tractor sign.
4. Erecting the bat house outside
Choosing the best site for our bat box
Since we are pole-mounting the bat house for hopefully the next 30 years, the main considerations are:
- Will the ground allow us to dig a hole deep enough to mount the pole?
- Could anyone accidentally run into the pole with a tractor, lawnmower, or truck?
- Assuming bats move in, could the guano poison our pets or over-fertilize something we care about?
- Can we mow around the pole and/or access things past it?
- Is the bat box going to get enough direct sunlight during winter (if you are in a colder region)?
- Will any trees fall on the bat box?
In our case, we chose the side of one of my pastures, on the outside of the fence. The bat box is 80′ from the nearest tree, in full sun all day, 6′ from the fence line (so I can mow it), and out of the normal path of tractors.
Dig the hole and prepare concrete
Pick your spot and use the post hole digger to lift out dirt.
Whenever it starts getting hard to pull dirt out with your shovel, use the digger pole (this is a long metal pole) or another poking instrument to loosen up the earth at the bottom of the hole. Then shovel it out, poke it more, shovel it out, etc., until you get down to 3-4 feet.
Engineer method for mounting the bat house pole
The engineer way (but complex) to mount the pole: Use an 8″ cardboard form (basically a can-shaped cardboard tube) inside the hole. Pour an inch or two of gravel into the bottom of the hole for drainage. Mix regular concrete in a wheelbarrel and pour it into the form around your pole. Use at least three tie-downs (like tent fly’s) to stabilize the bat box vertically while the concrete sets over the next 12-24 hours. Note: The concrete will be very soft and won’t help stabilize the pole at all. You will need a tractor or straps to hold it vertical at first. Once the concrete is set, fill in the outer edges of the hole with gravel, dirt, or more concrete.
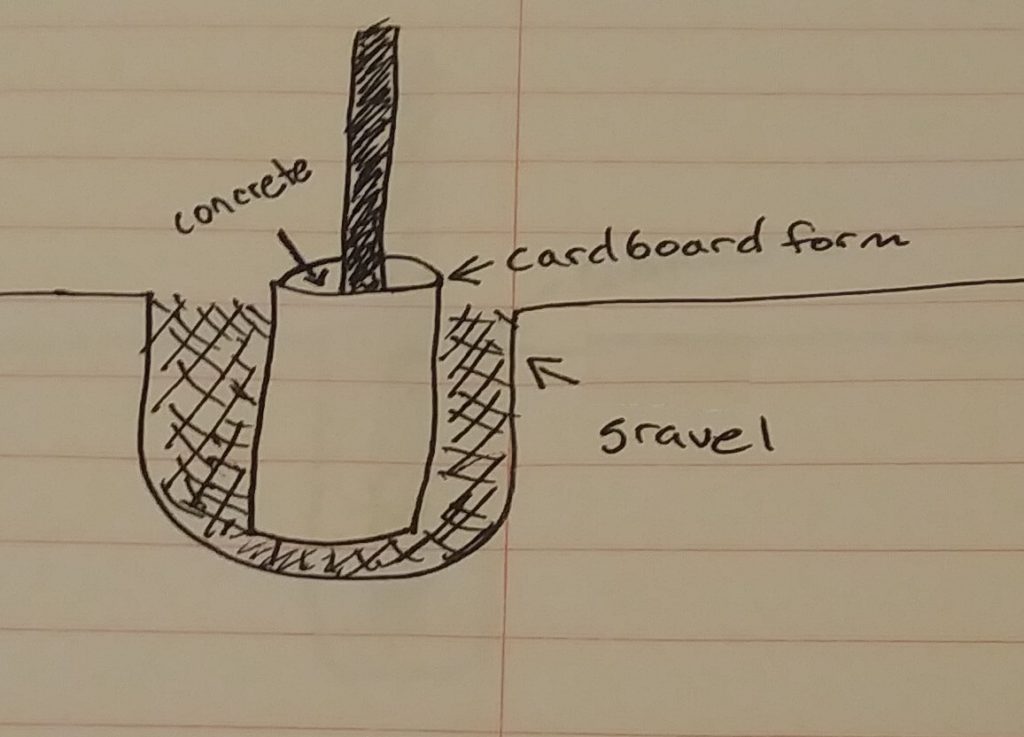
Engineer method for mounting a bat box pole in the ground. The concrete should stay solid for 50 years.
Easy method for mounting the bat house pole
Easiest way to mount the pole: Dig a DEEP hole (3-4′ down), but try to keep the hole narrow ( 3 x the diameter of your pole, which is about 9″ wide). Then put the pole in, fill in the entire hole with dry QUIKRETE, tamp it down, then pour water in. This harnesses the natural pressure of the earth to stabilize the pole and concrete. You won’t need to stabilize the pole for very long (20-40 minutes, if at all).
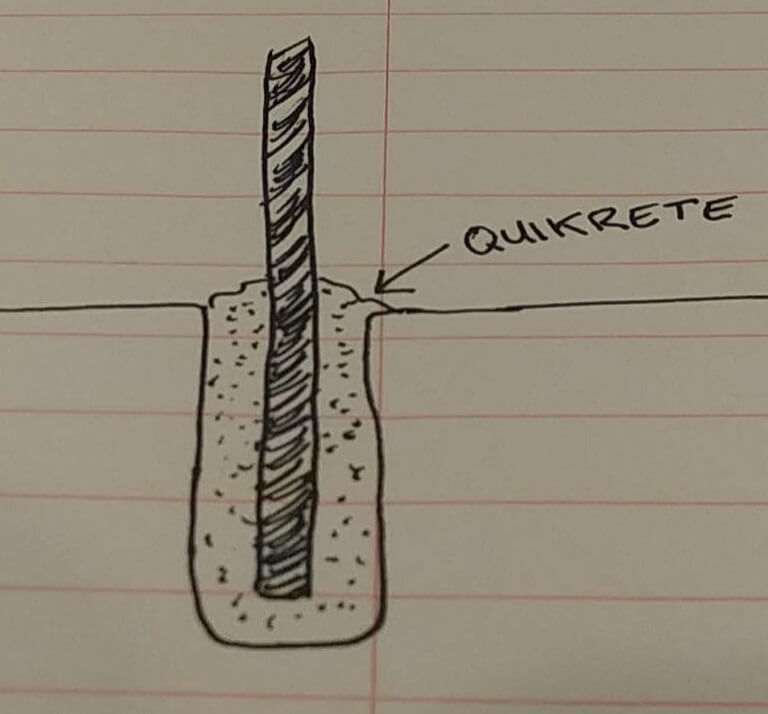
Simple way to mount a pole in the ground.
How to get the bat box stood up (it is heavy!)
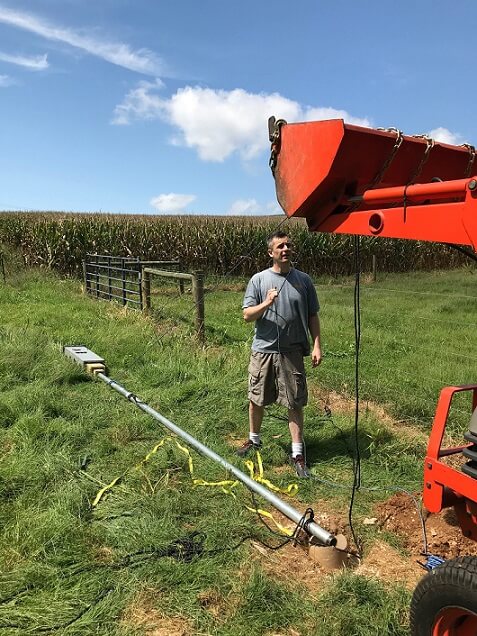
Josh using rigging techniques to pulley and stabilize the bat box, using the tractor’s front end loader for stabilization.
First, dig a hole for the pole. I recommend at least 3-4′ deep, and about 8-9″ wide.
Put the pole together so that it is full length (15-20′ tall)
You will need to put the pole pieces together so that it is full length. Your coupler goes between the pole pieces. Use your chain wrenches to tighten them as much as possible.
Tip: We had trouble tightening the pole because there was nothing to grip and we only brought one chain wrench. At one point, we were using the bat box itself as a grip, and twisting it against the pole. Not a good idea. Don’t do this.
Raising the bat box
74 years ago today: #IwoJima. pic.twitter.com/FKpVwBuTlF
— Matt Hayes (@MattHayesCFB) February 19, 2019
When you are ready to raise your bat box, align the bottom of the pole with your hole. The bat box and pole are VERY HEAVY and DANGEROUS when they are vertical until the hole is filled. Make sure the pole bottom is where it needs to be.
Have one friend push the pole bottom toward the hole. You hoist the bat box section upwards and your other friend pushes the middle of the pole up. You and your friend keep walking toward the hole while pushing the box higher and higher. The bottom of the pole should be going down into the hole now. And suddenly, your bat box is vertical!
We tried to use rigging to pull the bat box into the air. This did not work (it was too heavy to pull). But once it was up, we were able to tie it to the tractor’s front end loader about 7′ off the ground. This made it a lot safer to work around it until the concrete set.
Adding concrete to stabilize the pole
Simple method (with QUIKRETE): Now (while you have two friends holding onto the pole for dear life), start adding QUIKRETE to the hole. When it is filled in about 6″, start using the level to make sure the pole is straight up and down. Fill in the hole with QUIKRETE, leaving about 4″ below ground. Pour a gallon of water into the hole and let it drain through. The pole may stay upright at this point. If it wants to lean, stabilize it until the QUIKRETE solidifies (30-40 minutes).
Engineer method (with regular concrete and forms): Stabilize your bat box in the air using tie-downs or a tractor front-end loader or some other method. Fill in the area around the cardboard form with gravel. Pour well-mixed concrete into the form. Wait for it to set.
Optional final steps:
- Top the hole off with more concrete and slope the mound of concrete away from the pole.
- Push dirt on top of the concrete and slope the mound of dirt away from the pole.
- Use tie-downs to stabilize the pole while the concrete sets.
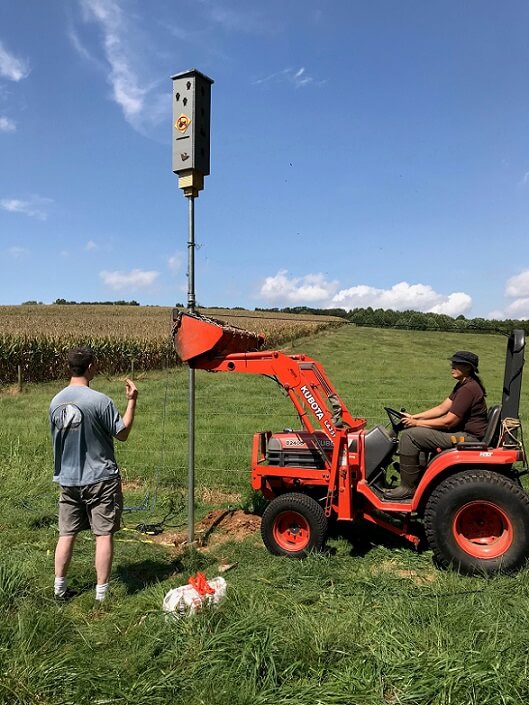
We used the tractor to make fine adjustments to the pole and to stabilize it while the concrete set. That’s me on the tractor!
YOU DID IT!! The bats have a home!!
At this point, you should high-five everyone, take pictures, and go get lunch! Well done!!!!
The bats thank you!
Don’t forget to leave a comment about your own bat box building adventures. I would love to learn from your experiences!
Or show your love for bats by sharing this article and maybe inspiring others to build bat boxes.
I’m in small enviro group Aurora, CO and we’re building 4 bat houses like you did. (great write up with key comments) Our bottleneck is getting permission to erect them but nothing unusual about questions. Current question is what will we do with dung that collects around the base of the pole. Concerns are how much collects and will it present a health issue. Our sites are like yours with 6-12″ grass in a field. All problems I hear are usually from bats in a house attic where the fungus can grow. I”ve tried multiple bat groups and BCI but can’t get any answers as to how to answer this question or resolve. I’m thinking with tall grass, rain, snow the dung might decompose into soil? Should we plan to somehow clean up monthly? Does it ever generate dust? thanks
Great write up. Very helpful.
Did you ever get bats?
thanks
Did you both stain and seal interior walls or can I just seal it? Update!? Have any bats taken up residence yet?!
That was remarkable! you guys are amazing! Thank you for sharing and will let you know how box goes. Thanks for going into all the detail. Does the pole need to be that thick of diameter? Seems so thick to me and heavy. Could it be a 1.5 or 2 inch metal pole?