I have approximately 20 acres enclosed by a high tensile electric fence. I put it up myself and have been troubleshooting this electric fence for about three years now. These are my lessons learned about how to troubleshoot electric fence problems.
It is a constant struggle to keep an electric fence working. Between trees falling on it, weeds growing up it, lightning striking it, and wear and tear on the insulators, you can expect to maintain it a few hours each month. The good news? This is a great excuse to go on a walk with your dogs (while carrying a bundle of tools with you).
Here are all the ways my fence has broken, and how I fixed it, and how I am trying to prevent future problems.
First question: When you put in the fence originally, was the charge good?
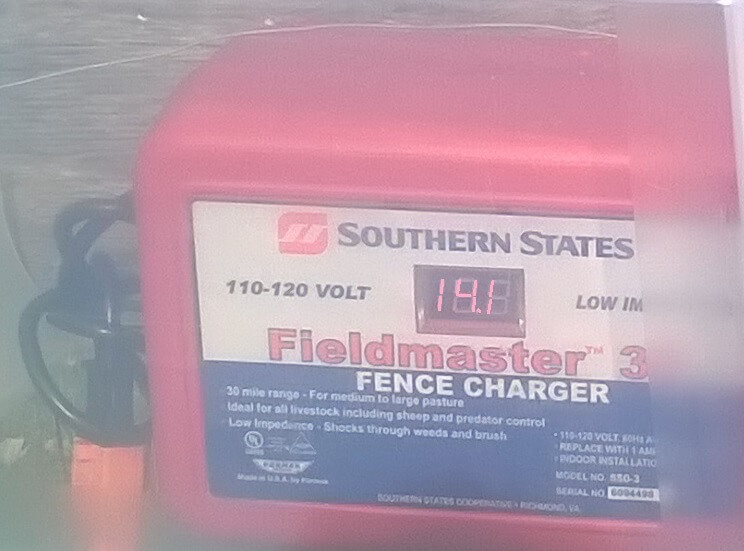
When I first put in my fence, I had almost no faults. My fence charger showed 14.1, which I think translates to 14,100 volts. To put things into perspective, these fence chargers are effective deterrence against cattle down to a reading of 2.0. Horses will avoid the fence down to 0.5 or even lower.
If you answered NO – that you never had a good charge on your fence, then you need to ask whether your wires are insulated properly, or whether there are major design flaws. This may not be fixable without rebuilding some of your fence. Check this document by Kencove which I used to build my own fence. It has good advice for designing an electric-ready high tensile fence.
^^ In particular, be careful how you string the brace wire on your corner posts. If you aren’t careful with how you route it, this wire will lie against your fence wires (causing a short). Normally you want the brace wire to be on the inside compared to other fence wires.
If you answered YES – that you once had a good charge (like the picture of the fence charger above), but over time your voltage has dropped, then it should be fixable. Read on!
Is your electric fence grounded correctly?
Electric fence chargers need to be connected to the ground with a long metal rod. Most manufacturers say that you need three 8′ (2.8m) ground rods pounded into the ground, spaced several feet (2m) apart. If your fence is less powerful during dry weather, it is a sign that your grounding system needs help.
This is not my video, but I recommend it. It shows you how to ground your fence correctly.
Tips for testing your electric fence
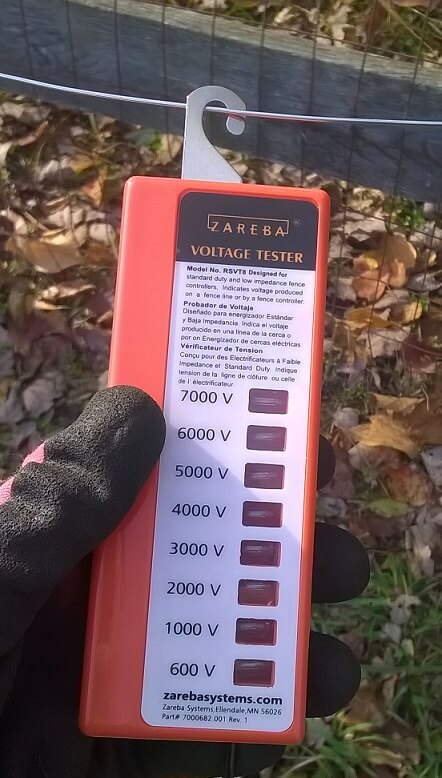
You can purchase a voltage tester at your local farm store. Hook the top end to your electric fence, plug the bottom end into the ground, and see whether lights flash. This is a slow, annoying way to test your fence because you have to plug it into the ground each time. More expensive testers will show you a digital readout instead of lights.
No fence tester? No problem.
A word of caution: This advice is from my own experience. I’m not an expert. Perform at your own risk. If you are wearing a pacemaker or getting zapped would be really bad, don’t do any of these things.
Electric fences for farms send very short “pulses” of electricity across the wire. Normally one pulse per second, and each pulse lasts a tiny fraction of a second. This is meant to allow the animal (or human) to get away from the fence before they are shocked again. If you have a fence charger, you probably have heard it clicking like a metronome. Each click is a pulse.
Electric fences are not meant to do permanent harm to animals (or humans). The voltage can be very high, but the amperage is low. Amps is what causes harm when we get shocked. Amperage should ideally by around 1. Voltage should be around 2,000 to 15,000.
I’ve been shocked at full strength (10,000+ volts) a few times. Not recommended!!! My most memorable shock actually left small entry and exit marks (they looked like small ashy circles with a burnt dot in the center). I haven’t had any long-term damage but I don’t want to repeat the experience!
The Badass Method for testing electric fences
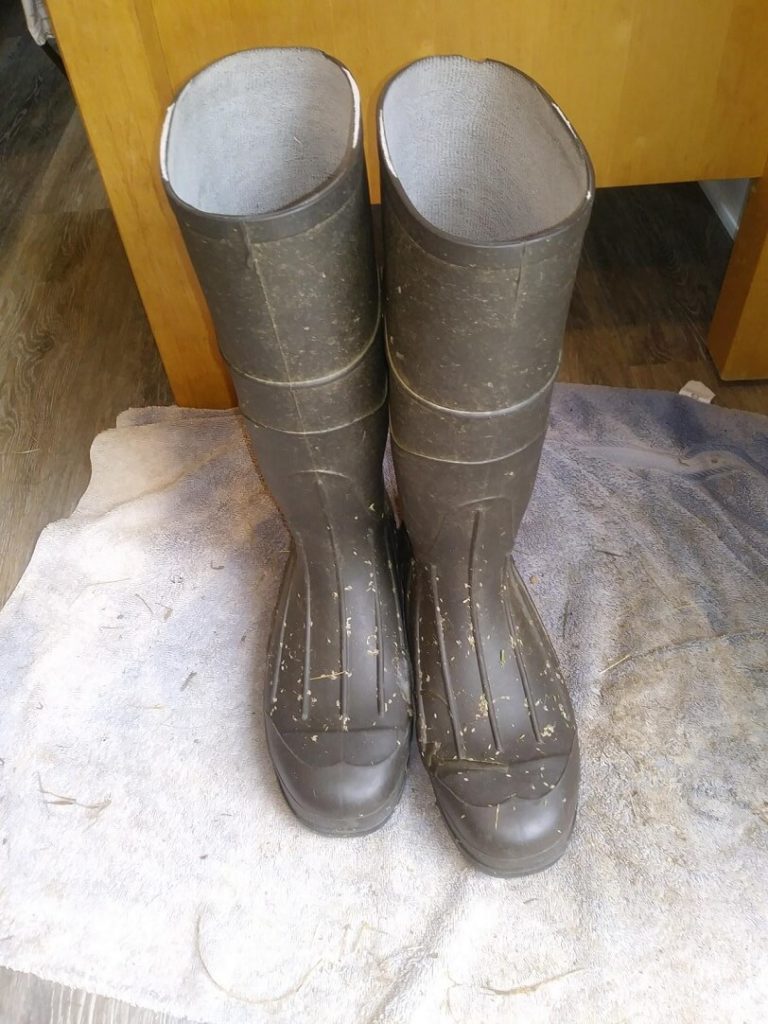
Ye olde rubber boots, AKA “Muck boots”. Available for $20 at your farm store. They provide significant protection against shocks.
Find some tall rubber boots and wear them. Assuming they don’t have holes, the grass isn’t higher than your boots, and you aren’t touching anything that could act as a ground, you will be mostly protected against shocks. This means that you will feel the zap in your finger, but it won’t go through your entire body like a lightning bolt. I have been known to test fences directly with my hand while wearing rubber boots.
This method is very impressive to people who don’t realize you are wearing rubber boots.
The Grass Method for testing electric fences
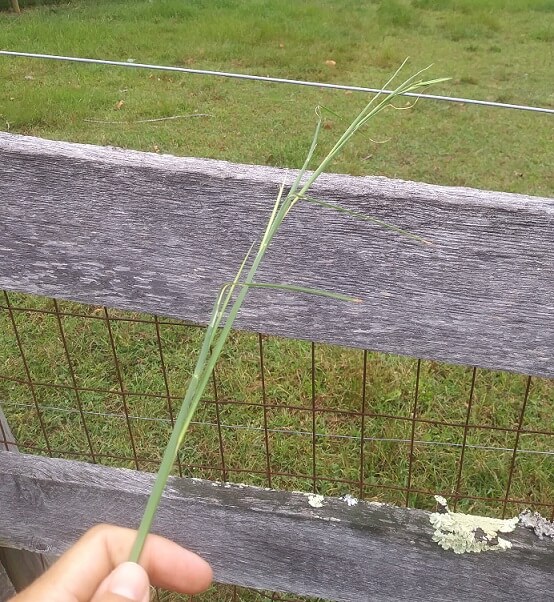
Start with a long blade of grass (at least 6 inches long). Hold one end, and lay the other end on your electric fence. You probably won’t be able to feel anything at max extension.
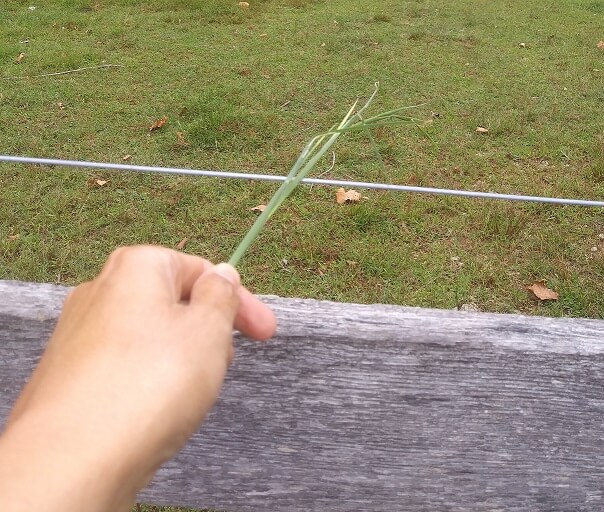
Slowly choke up on your grass stem. As you get closer to the fence, you will start feeling a very light zap in your fingers. This means the fence is on. Stronger voltage and wearing (or not wearing) rubber boots will change the distance you can feel a zap.
Use the grass method to test your fence when you don’t have rubber boots or you want to avoid pain. Pluck a long stem of green grass (ideally 10 inches or longer), and hold one end of it. Dangle the other end against your electric fence. Normally you won’t feel anything at this point. Slowly push the stem toward the fence so that there is less distance between your hand and the fence. At some point, you will start feeling a very faint zap. The closer you are before you feel the zap, the lower voltage and/or the more conductive your grass stem is.
Troubleshooting your electric fence
Did your Fence Charger stop clicking, and looks powered off?
Lightning strike on the electric fence destroys the charger
If you had a thunderstorm last night, I have bad news for you. Lightning probably hit your fence and traveled along it to melt the charger. Your charger is dead.
What can you do to prevent this in the future?
- Get a good warranty on your fence charger and keep the paperwork handy. Make sure the warranty protects against lightning strikes.*
- Install a lightning arrester on your fence about 50-100 feet before it connects to the charger.
- Use a surge protector between your electrical outlet and the fence charger.
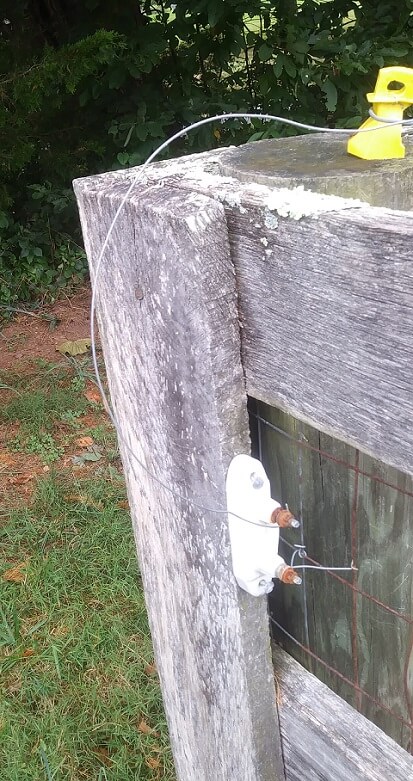
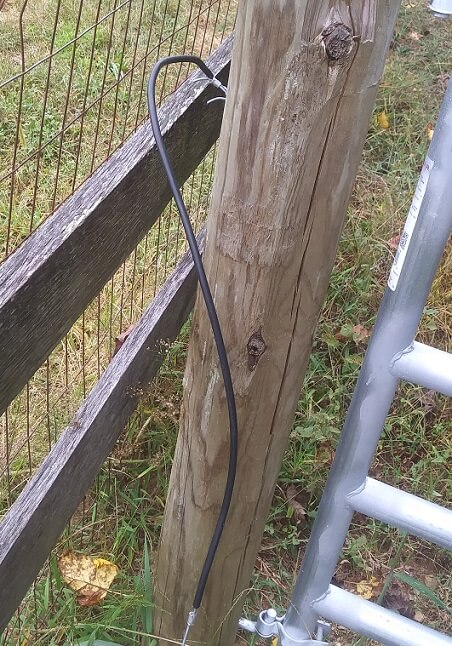
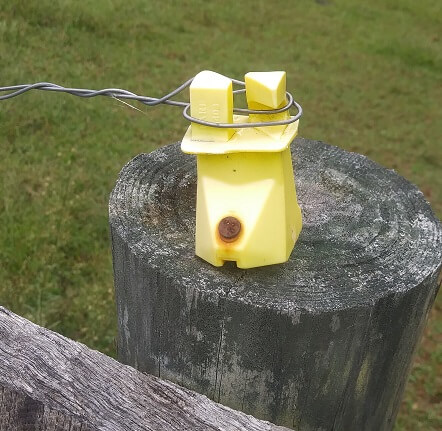
I use a Zareba Lightning Arrester. You connect one side to your electric wire, and one side to the ground. When lightning hits your electric fence, the electricity travels to this spot and then shortcuts to the ground by arcing across the arrester. As long as your fence charger is 50+ feet beyond this spot, it avoids the electricity.
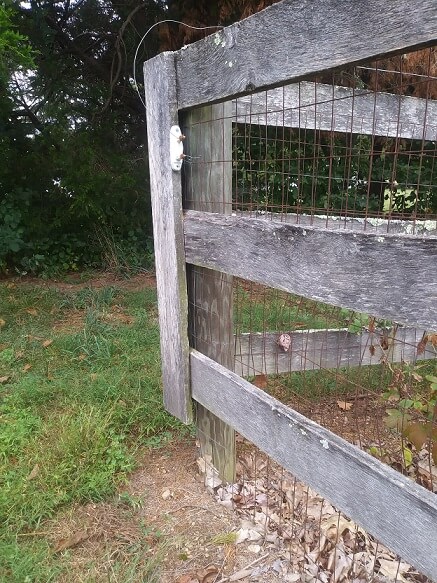
In my case, my non-electric fence is buried in the ground, so it works as a ground rod for my arrester. If you don’t have something like this, you should either bury your ground cable or install a ground rod.
My first year with electric fences, I had two chargers destroyed by lightning. I installed an arrester and haven’t had a problem in about 18 months.
* Don’t be like me and wait for shipping on a replacement charger. Get a new fence charger right away and install it. I had a cow escape my fence four days after the charger died. That stress was NOT worth saving a hundred bucks.
Blown fuse on the fence charger
Most fence chargers have a fuse inside them. This fuse limits the amperage, which is an important safety measure (getting electrocuted is not good). My fence chargers all use standard 1-amp fuses. These can normally be bought on the same store aisle as your charger. If in doubt, just replace it.
Lightning and blown fuses: When lightning hits a fence charger, the fuse will often explode. If you open up the fuse and shards of burnt glass fall out, it isn’t worth trying to fix it. Warranty repair and/or buy a new charger. I once spent a few hours trying to remove the pieces, clean out the compartment, and put a new fuse in – guess what, it didn’t work because the charger was melted on the inside.
If your fuse is just blown (it will look like it has smoke inside the glass), definitely try replacing it! This will often fix the issue. Since installing a lightning arrester, I’ve started to just get blown fuses instead of melted fence chargers. Big improvement.
Your power source isn’t working, so your fence charger is off.
If you use AC for your fence charger, make sure the power outlet is working. You may have to flip the breaker.
If you use batteries (solar or direct current) for your fence charger, make sure the battery is plugged in, the connections are polished, and your battery is charged up. The battery could also be frozen or missing battery fluid, etc.
Random note: I tried solar and found it lacking in juice. Not good for cows, they will ignore little zaps. I’ve only seen solar used successfully with horses.
GFCI outlets and electric fence chargers.
Were you amateur enough to use a GFCI outlet to power your fence charger? (I did this at first). Housing codes require that external power outlets are all protected by GFCI. Unfortunately, the act of zapping a critter is exactly what GFCI triggers on. It can feel the power flow into the ground and will shut down the circuit.
You need to get your charger off GFCI or it will keep shutting off. Luckily, this is pretty easy to do. Replace the GFCI outlet with a non-GFCI one. Then take steps to protect this outlet so that people can’t electrocute themselves by using it. For example, I have my outlet in a box that is physically locked shut to prevent access. You are responsible for complying (or not) with your local housing code.
Did the voltage on your electric fence drop to zero suddenly?
Whenever you have wires in close proximity to each other, they are likely to touch. Wires have an amazing way of breaking through anything you put in their way (such as plastic insulators, electrical tape, wood blocks, and zip ties). If your electric fence connects to a ground wire, your charger reading will suddenly drop to 0.
Pro tip: I find it more effective to pull wires away from each other (such as using zip ties or wire to pull non-energized wires into a bundle), than to put an insulator between touching wires.
If your voltage was humming along at say, 4.7, then suddenly dropped to 0, you have a direct ground problem.
Look for cables that fall and touch either the ground or a non-insulated wire.
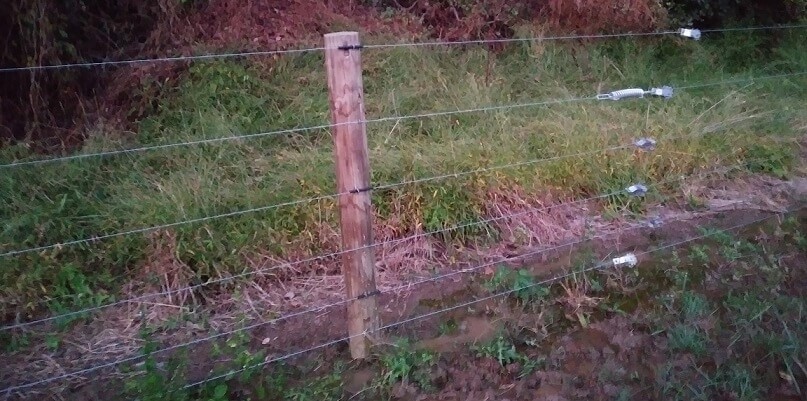
This means that you have an excellent conductor (such as a metal wire) connecting directly from your electric fence to the ground. Or part of your electric fence has fallen to the ground. Or you use T-Posts and one of the insulators broke so the fence is touching the T-Post directly.
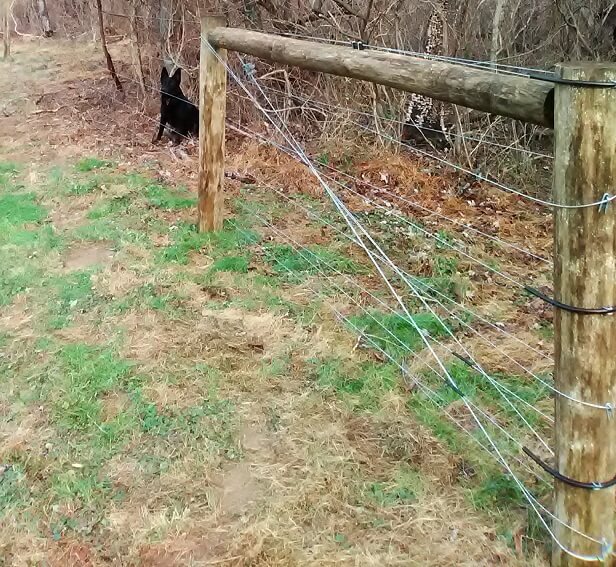
This T-Post was the cause of a fence fault. A tree limb fell on the fence just past this T-Post, which broke the top insulator. The insulator fell down, the wire came off and laid against the T-Post directly. Instant ground fault.
Go find your ground fault. Take a variety of spare insulators with you.
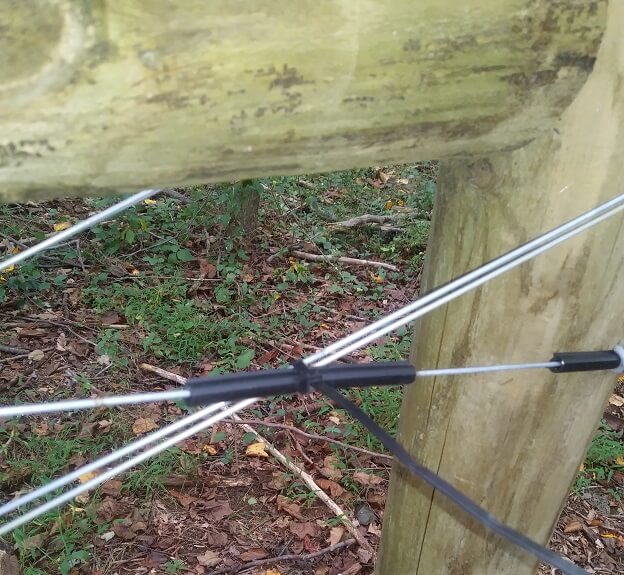
This is an OK fix for cables that want to touch each other. At first, I tried to use electrical tape as an insulator. The shocks melted through the tape after a few months. This insulator will last a year or two before natural friction (caused by wind, storms, etc) wears through it.
A better solution would be to pull the brace wires together in the center using zip ties or flexible wire. This will keep the brace wires from touching your fence wires, and last much longer. I changed to this method (pulling brace wires together in the center) after a few years.
When you are putting in a new fence, there is a way to string the cross-brace wires so that they don’t touch your energized wires. I didn’t realize that when I was putting in the fence, so this year (2020) I finally re-strung the bad ones.
Is the fence voltage slowly dropping over time?
Fix electric fence – stuff is touching your wires!
When your voltage slowly drops, it means that you have lousy conductors touching your electric fence. A small amount of your voltage is traveling through these conductors to the ground, and is lost.
- Long grass is the most common. I weed spray my fence lines with long-term weed killer to prevent this issue. It is tricky (and dangerous) to mow around high tensile fences, so I avoid it.
- Fallen trees or limbs across the fence. If you live in a wooded area, you will have stuff fall on your fence.
- Spider webs across the fence??? I think I’m just paranoid, but it makes me crazy when I see spider webs bridging between electrified and non-electrified parts of my fence.
- Water or ice. If you have enough rain or sleet, the ice can bridge around your insulators and cause a temporary dip in your voltage.
Fix: Are your electric fence insulators broken?
Insulators are the plastic pieces that go between wood posts and your fence, T-posts and your fence, trees and your fence, or your fence and other wires. A well built electric fence should have insulators between the fence wire and everything else it touches, except for air. Over years, your insulators may fail. The metal staples used to attach insulators to wooden posts are the main reason for insulator failure.
Important: Wood is not a good insulator.
If I were to re-do my fence, I would be way more careful about how I hammer in the staples. It is extremely important to not dent the insulators.
Metal staples break electric fence insulators over time
You need some sort of plastic or ceramic insulator between your electric fence and the fence posts. Especially when it has been wet, your fence posts will conduct electricity to other strands of the fence, and/or to the ground.
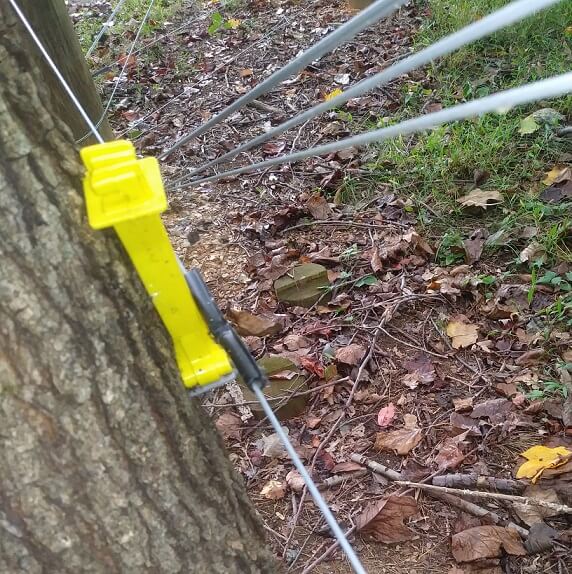
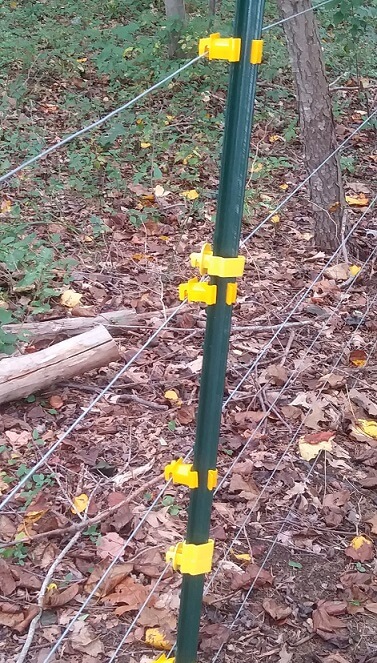
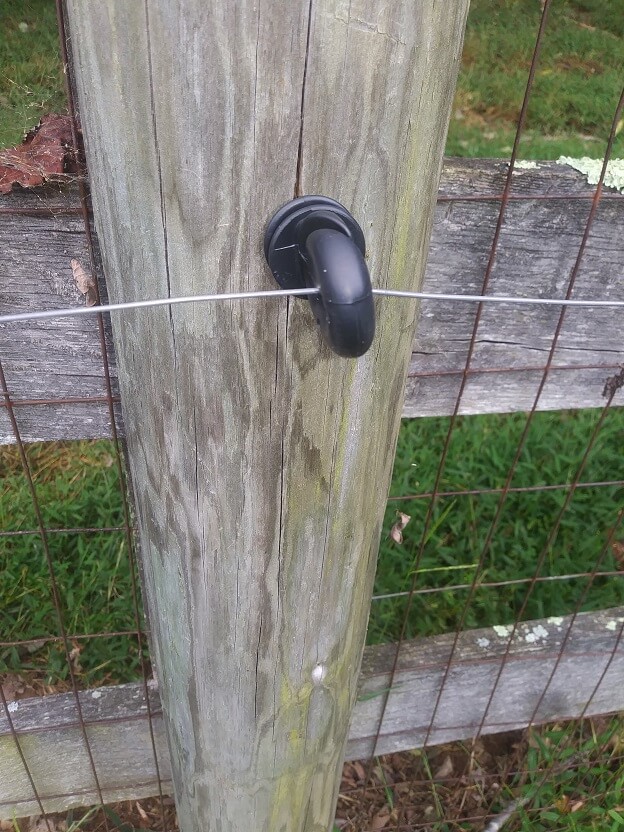
This is a failed insulator on my property (the black tube). It was stapled to the tree, the tree grew, the staple wore through the plastic. The fence started losing power into the tree as a result. The yellow insulator is my fix. It is a 1×6″ T-Post insulator that I stapled into place. This should last a long time.
Finding staples that cause a ground fault
- Metal staples can dig through plastic insulators over time. When this happens, the staple contacts your electric fence wire and provides a conduit to the wooden post. This is a major problem with my fence, and is hard to diagnose. The way I look for it is to touch each metal staple with my finger (see The Badass Method above) and if I feel a zap, it means the staple has worn through the insulator. To fix, use a screw-in insulator instead.
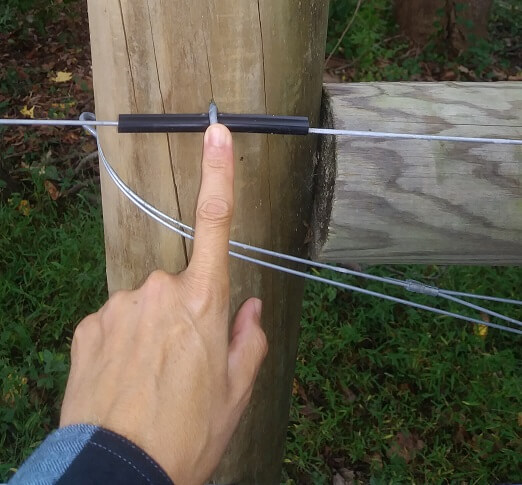
Testing to see if the staple has degraded the insulator. If the staple has broken the plastic and is contacting the electric fence wire, you will feel a zap in your finger. Or get a shock, if you aren’t wearing rubber boots.
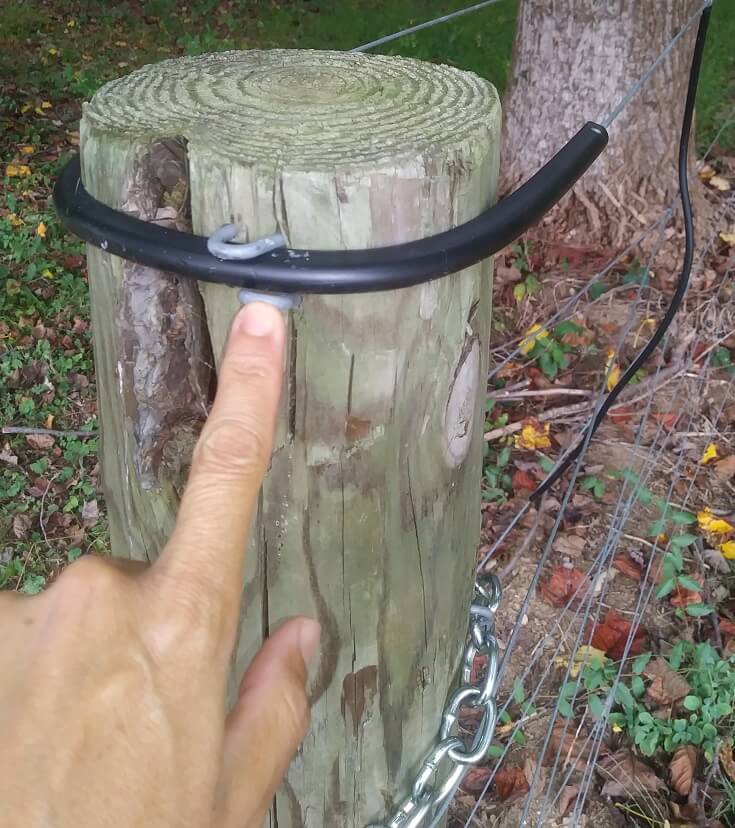
Testing another insulator on an end post. When I built the fence, I didn’t realize that staples will wear through insulators over time. Try not to dent the plastic when you are hammering. End and corner post insulators should be held in place by upper and lower staples that are not tight.
Your fence is stapled to a tree which is growing over it.
Turns out, tree bark grows over stuff that is attached to it. Normally the additional pressure will cause your staple will dig through your plastic insulator first, before the tree totally overwhelms your wire. My lesson learned is to just use screw-in insulators whenever I am trying to keep my wire off a tree.
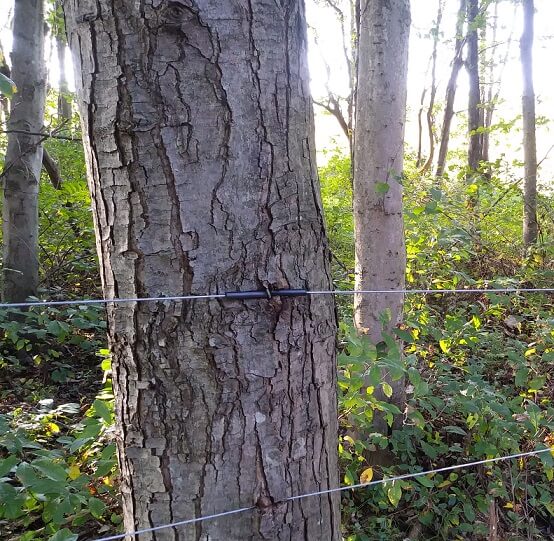
This is a tree on my property which is growing over the electric fence. Three years ago, when I installed the fence, it was barely touching the tree on one side. Now the tree has contact for about 3 inches along the insulator. The bottom wire is not energized. I have replaced the insulator and staples with screw-in insulators from Zareba.
Troubleshoot electric fence – replacing tube insulators with screw insulators
These heavy duty screw-in insulators are my new best friend. I’m using them to replace the tube insulators on my high tensile fence because I don’t need to restring the wire. They have an opening that you can push the wire through broadside. .
I originally used these yellow plastic insulators for the non-tensile parts of my fence (connecting the high tensile fence to my charger near the house). They are a huge PITA. If your posts are hard, the nails bend when you hammer them and you have to start over. The slight pressure over years will cause the insulator to pull against the nail and eventually break or bend in half.
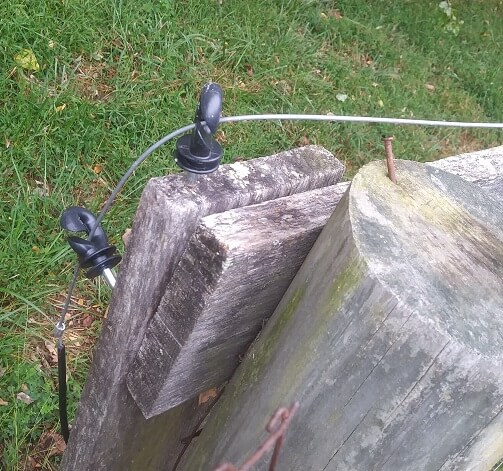
My last praise for these screw-in insulators: They don’t use cheap nails. This fence segment is made of very hard wood. You can see a nail left over from a failed plastic insulator. The heavy duty screw-in insulators can handle hard or soft wood without failing.
Good luck with your electric fence!
If you have a tip for troubleshooting electric fences, please leave a comment below. I would love to learn new techniques for fixing my fence!
If you want to see other topics about homesteading or dealing with livestock, let me know!
More articles about farm projects and the homesteading life can be found on our homepage.
Check out our About page for more information about Dirty Foot Farm.
Great tips here! Making sure the ground rods are properly spaced and using quality insulators makes all the difference. Also, avoiding metal-on-metal contact, maintaining voltage even in dry weather, and protecting against lightning can save a lot of trouble. Thanks for sharing these troubleshooting insights!
Hello from Ben in W Wa. I have been working with a 3.5kv – 0.2 electric fence for a few years now but want to rectify the situ.
I have 32grazing acres with 5 fields. From 2 to five wires hot. 12.5GA wire. I have 10 gal gnd rods spaced. A Gallagher 1800 charger (was tested). No significant faults on the fence. I believe my problem with weak output is due to voltage drift (three gates have arcing). I dont know how to rectify. Do you have a suggestion? Thanks much Sir.
Just attached the poly wire to my solar powered energizer. The wire is clicking. Is this normal?
Thanks.
I’ve had a short run of battery powered electric fence around a small backyard garden to deter the deer for the past year. The red light flashed when the switch was in on position but didn’t make any clicking or popping sounds. I know it worked because I watched baby deer touch it with their nose and jump straight up in the air. Now all of of sudden it is making a popping /clicking sound each time the red light flashes. Is this what it’s supposed to do? And why wasn’t it making a sound before?
It must be grounding out slightly. Mine will make the snapping sound if the electric tape shifts and touches a tree or something.
I have American Farmworks 18 mile solar controller the system was installed about 1 1/2 years working fine, I now have a ground issue the wire is not hot only a small current when you ouch any T post you get the full charge how do i fix this?
the ground system is 3, 6 foot rods places 10 feet apart contacting to the ground poston the controller
Why might my electric fence be arcing at the yellow plastic insulators that are connected to a metal T Post? No wires are directly in contact with each other or metal?
Well. I asked what. To do. When you’re negative and positive post on Finser come lose.have no. Idea what to do
Hello my electric box comes on when it’s plugged in and works about 20 clicks then just stops clicking . Why does it do this if I unplug it and plug in it’ll do the same thing
I just installed my first electric fence and the batteries and draining quickly. I have two 12V 50AH batteries, they are two years old, but never were used. I have two 8 foot ground rods pounded 5 feet into the ground each, over 9 feet apart along the fence line and close to the charger and battery. It’s a Parmak 12UO charger and I’m running 6mm poly wire from Premier1. It’s for one pig and it packs a punch, over 10K volts, and the pen is roughly 16′ X 32′. I attached insulators to t-posts and to the hog panel themselves, wire is only toughing insulators, not posts or fencing – although it’s close in a couple of places.
Any ideas why my battery is dying so fast, like I’d need to swap batteries once per day at this rate…. maybe they are not fully charged? Not enough grounds?
Any advice is greatly appreciated!
Thanks!
I have just installed all new fencing with a new agri 20km electric fence unit. My voltage is working fine but when I test the fence my amps are really high. Like up around 30. I’ve walked my fence line and can’t feel, hear or see any faults. What could be causing this.
I have en electric fence charger that is “double clicking” and the charge is pulsing from 3.8 to 7.9 with each click. What could be wrong?
We’re having the exact same problem this year after years of no problems. Have you had any replies?
We’ve checked every insilator, every tree. And today we’re going to try a new earth and have read where you can earth anywhere along the fence as lon as you have an earth wire attached to a no electric wire at or close to your unit.
Look forward to your response.
My neighbor’s Zareba 200 mile is generating transients in our power supply. We reinstalled the original ground and added two new 8′ posts at 12 and 24 ft spacing, but still picking up noise in my lines. Is this still a ground problem or is that controller just that powerful it can’t be overcome?
New electric souce tests. When i ground it and hook a wire to the powered post, it tests properly at the end of the wire. However, when i attach the wire to the fence, it np longer tests as having power. When i remove it from the fence, it has power again.
Help and thanks
Hello John,
I think that means that your fence is extremely grounded (probably metal on metal, like a wire touching a T-Post). My voltage goes to 0 when I have a direct metal-on-metal ground.
Betsy Johnston & Derek Hill
Hello, I have a 110v electric fencer and need to run one wire 25 ft. An electrical engineer told me that I didn’t need a ground wire on the fencer since it was so short and a saltwater otter touching the wire would get a serious shock completing the circuit. With the boat sitting in conductive saltwater and many boat through hulls, props etc you don’t want any [zero] stray current. So I worry even connecting the ground to the boats negative could create a circuit which ends [always in the water through the engine ground]. So it would be perfect if I could just omit the ground connection thereby only creating a circuit when the otters try to come on the rear boat steps. If this is the case most boat would leap at the chance to protect their boats in the winter when otters search for a comfy place to lie,eat and poop on anything soft like rope on the boat. The residual smell is terrible and hard to get rid of. Thank you for your consideration. Regards,Derek Hill
betsyderek@gmail.com
I’ve got a fault underground, I can hear it clicking so I’m going to dig it up, but do I need special insulator because of the high voltage?
Is it possible to splice together and re-bury or do I have to replace the entire run?
Thanks
Hi. You can join them together but you are better off to use a proper conductive electric wire joiner, rather than splicing. Splicing will allow corrosion to set in and you’ll be digging it up again in a year. Make sure you insulate the join from the surrounding, soil. You probably already know this but just to be safe.
I am installing a polytape electric fence. Plastic covers over t posts. Plastic insulators screw into sleeve. 3 strands. The tape was not being held tight enough in the insulator after being pulled tight. I have about a 1/3 held tight by drilling a screw into insulator that goes thru the polytape and into other side of plastic. But those plastic covers touch the ground. Did I just ground out my fence? Plus wouldn’t I need a lightening arrester on both directions from charger?
In my experience, chargers have one positive wire which leads out to the fence, which does not complete a circuit (on purpose). And the charger has a negative wire that goes to the ground. So that when an animal touches the fence and the ground at the same time (which they do), the circuit completes and the animal gets zapped. The lighting arrester is only important for the wire that goes to the fence, because the fence is long and exposed to lightning strikes. The negative wire should go to the ground within a few feet of the charger – if lightning gets the negative wire, everything including the charger has suffered a direct hit.
we bought this new and had it for a back up. just took it out of package but it wont pulse it just stays on and lights up tester to 2000. there is a blue round piece with two wires on it could that be bad. we have never used it till now
I have a 50mile blitzed ac fence charger that clicks but doesn’t flash. I borrowed my neighbors charger and it works fine. Fence line is not the problem. I took the back off the charger and could not find any fuse. Does the flashing light go bad ? Or is there a fuse I’m missing? Thanks for the help
I have had an electric fence around my small garden. Have a Southern States Fieldmaster 30 electric charger. It starts out charging about 10.8 to 10.2 and after an hour when you go back it’s not charging at all. Any ideas. We changed the ground and hot wire, thinking there might be a break. Fuse doesn’t look black. There is a bare wire electric wire, about an inch long, going into the box, but not touching it; I taped it up. Somebody said it was dry so pour water around the ground pole. Still the same thing. Don’t hear it grounding out anywhere.
Hi,
We have 3 miles of electric fence keeping some cows in their pastures. The charger quit quit working. Changed out the fuse ( old one was not blackened) it powered up for a minute then died.
Where do we start?
Thanks
John
warranty repair on the charger. It should be powering on and clicking with full voltage if you disconnect the positive and negative wires.
my round wires have some current on them. Can you tell me why?
Why do the connected ends of my insulated electric fence handles spark where it connects to the ends on both sides?
We had an energisers stop suddenly working. Sent it in for a warranty repair and they came back to me saying that it was hit by lightening so is not covered after 6 months. Of course they offered to fix it for a price but it was cheaper to just get a new one.
We hadn’t had a storm for months so would it be plausible that the unit would continue to work and just suddenly stop if it was zapped a while ago?
Weird to me! When testing both negative and positive post show voltage. No voltage to fence, but disconnect negative post then voltage to fence.
Hi Lorie
Great site.
I’ve a battery powered fence. The charger clicks along nicely every second – controller shows 13.4V – until I connect it to the fence. Then it stops. It has rained cats and dogs for 3 weeks. Any ideas?
Thanks
Question if someone can help TIA .. Why doesn’t an electric fence shock you till you touch the fence and the ground wire at the same time.. Light flashes on charger but fence has no power. If you put one hand on fence and the other on the ground wire it will shock you but just touching the fence nothing… Have a solar country way fence charger.. The light on the charger is flashing showing batteries are charged.. thanks again.
Probably because you are wearing rubber soled shoes that protect you from the ground. If you really want to test it, try kneeling on the ground and touch the hot wire only.
I have a power wizard fencer that is supposed to be good for 100 miles !!! Four wire system I can’t get the current to flow all the way around my fence it loses power rapidly!!!! No shorts what is the issue??? It is extremely hot by the fencer but going away it gets weaker and weaker. All connections are crimped all jump wires ect.I tried just making two of them hot still just a tiny spark a half mile away! I have six ground rods
most of my fence is hot some not meter went to 0.0 . FENCE WILL SHOCK ME but still shoes 0. what could be wrong?
Charger plugged into a hood socket for past 5 years now it beeping ….what should I do to correct the problem??
You made a good point that trees can sometimes pose a problems when it comes to getting fences repaired. I might need to hire a professional for such repairs soon because there are times when my fence wobbles a bit. I think that a pretty good tackle form a large animal could easily break it.
I have a question about wrap around insulators at a corner post. I noticed a few are arcing/popping when the charger bumps. Without restricting the fence is their a good fix for this?
can I use 2 separate chargers on one ground rod system?
how close together can these 2 charger be?
can I run 2 different circuits from 2 different chargers on opposite sides of the post
This is a great article. I had a box that was working great, stopped using it for a while, but when plugging it back in, it wouldn’t work. Went around the fence line & cleared all that could have been in the wire. Still no luck. I’ve wondered if the wire touching the ground from limbs falling on it might be the problem, but haven’t been able to find out if it could be touching the ground. I think it may be touching the ground in some places. I’ve done everything else, including buying a new charger, so I’ll have to go scout again & possible get more insulators. Thank you so much!
I also need a tip and would be very grateful for any suggestions. I used a pulse generator for a short time (6 months) a couple of years ago and then dismantled the fence and left it in a dry shed. I went to set up the fence again and the unit is totally dead. I’ve checked my power source and the cables – all OK. I opened the unit and all the components look pristine inside. It’s a Gwaza 9002 Fence Energiser Mains/Battery ODIN 3.3J. There own website doesn’t have a support service. Just wondering if there’s anything simple that might be easy to fix without sending it for repair or buying a new one.
We’re livestock farmers and have successfully used electric fencing mainly temporary for many years. Just yesterday I got a mild shock from a gate that wasn’t supposed to be electrified and was no-where near either of our energisers. We checked round one fence no issues; although we knew it was unlikely to be that one as it was on slow pulse and the shock was fast pulse. To our surprise it was coming from the one on the other side of the track. There is a plain fencing wire under the track which will be used to pull through any future wires/pipes. This plain wire had contact with the barbed fencing on the non energised side of the track but no contact with the electric fence. What we did work out was that the very wet ground (lots of recent rain) was conducting electricity from the energiser’s earth to the under ground wire under the track to the barbed wire fence and gates. I would then earth it when I touched the metal gates or barbed wire fence. I even got a shock from the damp ground near the earth spike when I put both hands on the ground. We have since re-sited the energiser & earth spike further away from this very damp spot/pull though wire. The problems seem to be sorted.
I have a energizer that clicks and puts out a pulse that tests at highest level of my tester ( tester in contact with wire and ground inserted into soil)-this is with ground wire not connected. When I connect the ground the energizer stops pulsing. I’ve walked the entire wire and cannot find any grounding issues.
I’m at a loss at what to do next.
my charger blink off and on but not receive any volt-age through the wire come on off and on at the end
Hi Mark.
I have good voltage (8000 v) when testing from ground rod. When testing using the grounding post on the tester (~6in prong), voltage drops to 2000 volts. I have checked for vegetation and fence is clear. The problem recently started.
Thanks,
Steve
my high-t fence is up and there is a problem with the noon hot wires they have a voltage in them the hot wire have plenty of voltage can you help me
I had some wire tape melt in a grass fire. After replacement the power supply is in the green but does not click. This sounds bad? Fence has voltage.
Hello,
I have a 25 mile energizer went to plug it in the other day and it clicked then smoked. I didn’t change anything just did some random fence repair. We did however have a tree struck by lightning last week . The tree is about 15 yards from the fence line. Any ideas?
Thanks,
Mike
Hi Mike,
15 yards is definitely close enough for lightning to reach your fence. If it worked before then, and didn’t work the next time you tried it, I’m thinking lightning damage. Try pulling your fuse out (if you have one) and see if it is blackened inside. Definitely worth trying to replace the fuse first.
As to why it would click once and smoke, I don’t know that answer. I’d normally suspect the input power to be too strong or the wires damaged somehow in that case.
My electric fence charger clicks but the light doesn’t come on when it clicks and the fence is not working
I don’t have a trouble shooting tip, I need a tip!
I installed electric fence inside my yard to keep my digger dog in. It’s a plug in, not battery. I’ve got a long run around to a people gate and added a shorter run down the fence to the other side of the gate, with a wire “gate” across the wide mower gate. That puts my charger at the top of a U. I have a tester that just lights up if the fence is hot, not a regular voltmeter. It doesn’t light up at all, even near the box. I disconnected the new line and the original line lit up. When I moved the connection to the new line, disconnected the old one, there was no current, even at the box. I’ve checked all the standard things that might cause it to short out, but I’m not sure what’s next. Ideas?
Hello Lorie,
Sounds like something is directly grounding your fence to the ground. I’d look for metal-on-metal contact with something like your gate.